Kitchen Tips

How To Clean A Burnt Pan (With Easy Steps)

Source : facebook

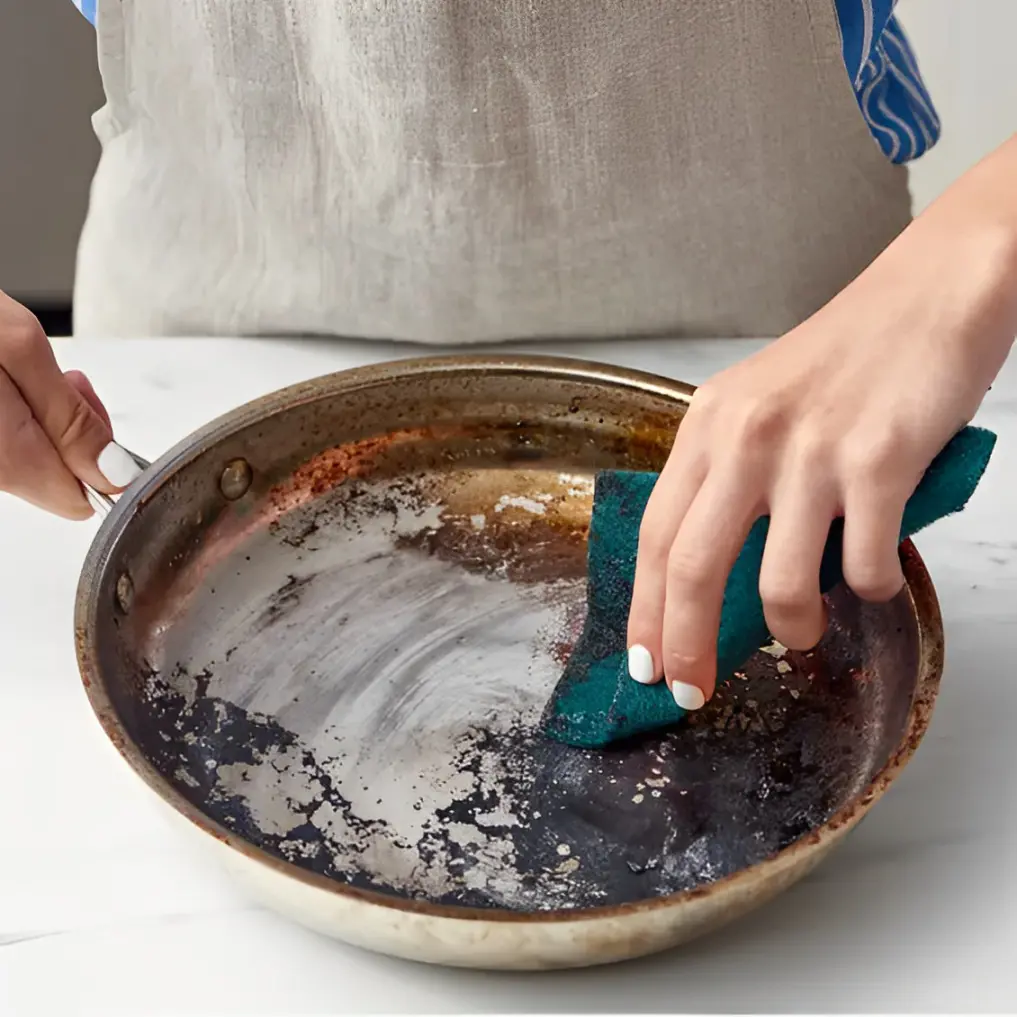
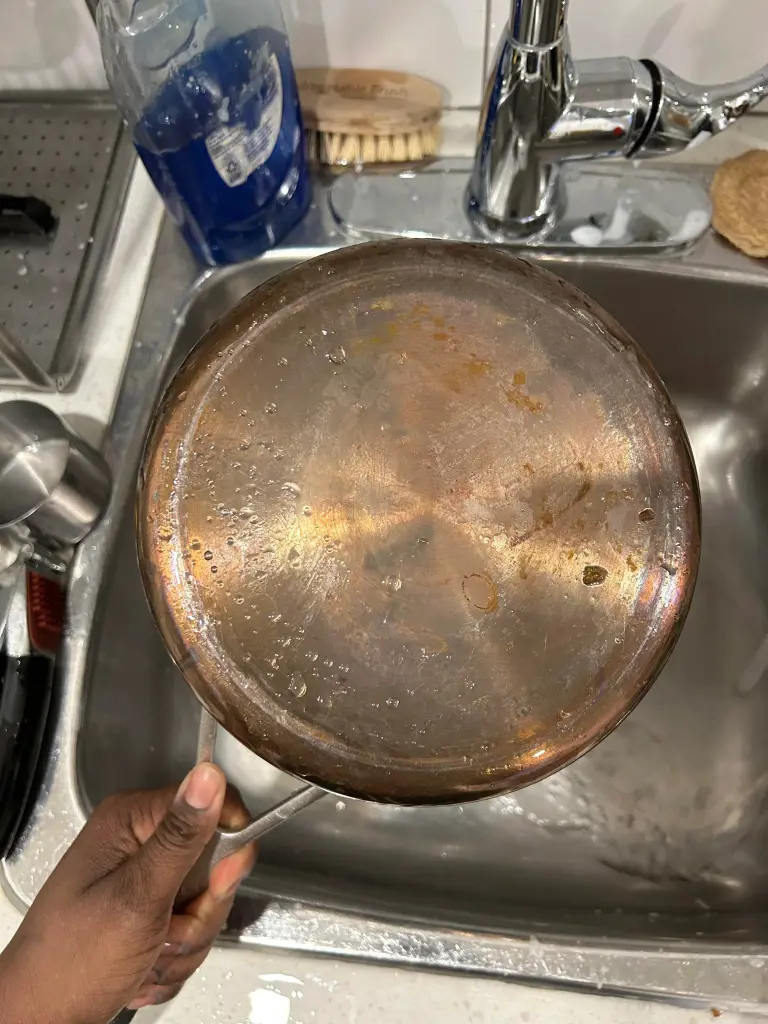
There's not much in life as depressing as the ordinary burnt pan: greasy, blackened, it's just a kitchen nightmare. Don't lose your cool! Cleaning that burnt pan of yours doesn't have to be a nightmare. 

Well, you can resurrect them with a few easy steps and using items present in every household. 

In the following post, we will navigate through some quick and effective methods of how to clean burnt pans.

How To Clean A Burnt Pan

After gathering all the necessary supplies and tools, it is time to understand how to clean your burnt pan. Below are a few methods that we shall explain to you in detail. Let us observe:

1. The Baking Soda And Vinegar Way

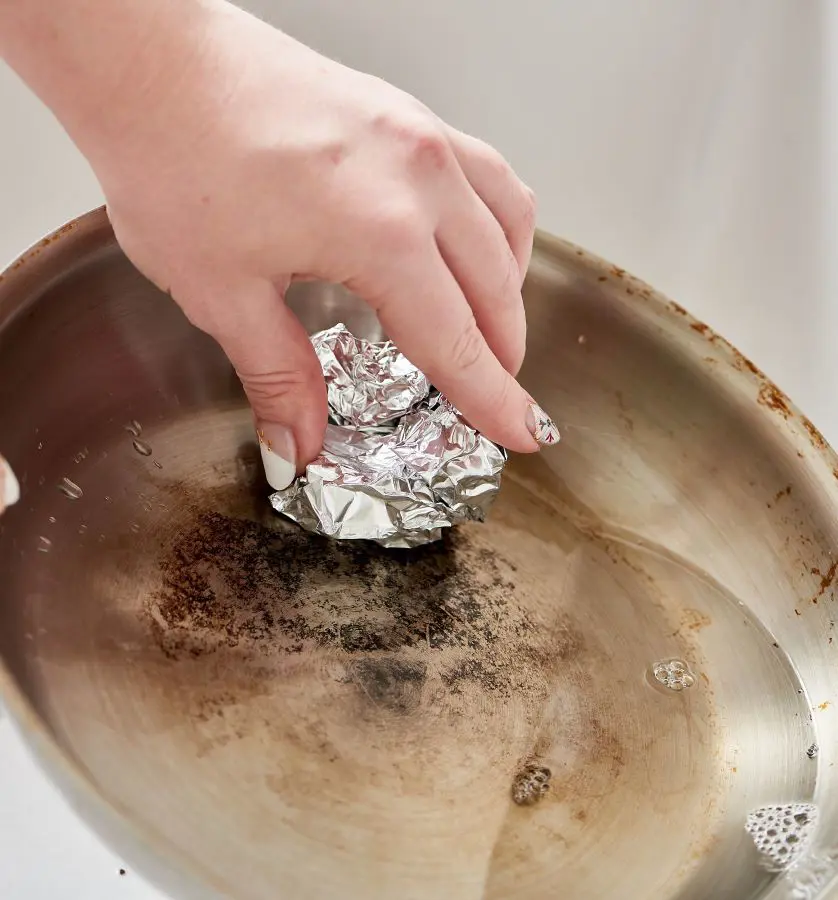
This is one of the most effective and environmentally-friendly ways of cleaning burnt pans. Below, we outline first the tool needed, after which comes a detailed instruction.

Ingredients and Tools

  • Baking soda
  • White vinegar
  • Water
  • Measuring cup
  • sponge or scrubbing pad
  • Wooden spoon or spatula
  • Dishcloth or paper towels

Instructions

  1. Let the pan cool completely. With a wooden utensil, scrape off the loose burnt bits.
  2. In the pan, have equal parts of water and white vinegar; make the solution deep enough to cover the areas that have been burnt.
  3. Boil on medium heat for approximately 5-10 minutes to loosen burnt food.
  4. Let the mixture cool down until it is safe to touch.
  5. Sprinkle abundant baking soda over burnt areas; it will fizz because it is reacting to vinegar.
  6. Lightly scrub in a circular motion with a non-abrasive sponge or pad.
  7. Rinse thoroughly with warm water to remove all residue.
  8. Dry it out completely with a cloth or paper towel to prevent rusting.
  9. Look at it again and repeat for stubborn spots.

Source : thekitchn

Pros:

  • Eco-friendly: Makes use of natural and non-toxic ingredients
  • Cost-effective: Ingredients are cheap and found within most homes
  • Gentle to cookware: Will not scratch a lot of new non-stick pans or otherwise damage them.
  • Effective against most burnt-on foods: For different types of food residue.
  • Deodorizing: It works very well in helping get rid of burnt food odors.
  • Safe for use on different types of pans: For stainless steel and cast iron, among others. 

Cons 

  • Time-consuming: Boil and cool-down periods may take as long as 20-30 minutes.
  • Requires repeated applications: In some tough instances, it may require more than one application.
  • Not suitable for aluminum pans: The baking soda's alkalinity will discolor aluminum.
  • Manual scrubbing required: It still needs to involve physical effort in removing the burnt residue. 
  • May not work well for severely burnt pans: Might hardly work with some really stubborn stains.
  • Makes a mess: It could create quite a mess when the fizzing reaction is not controlled correctly.

2. The Lemon Juice Method

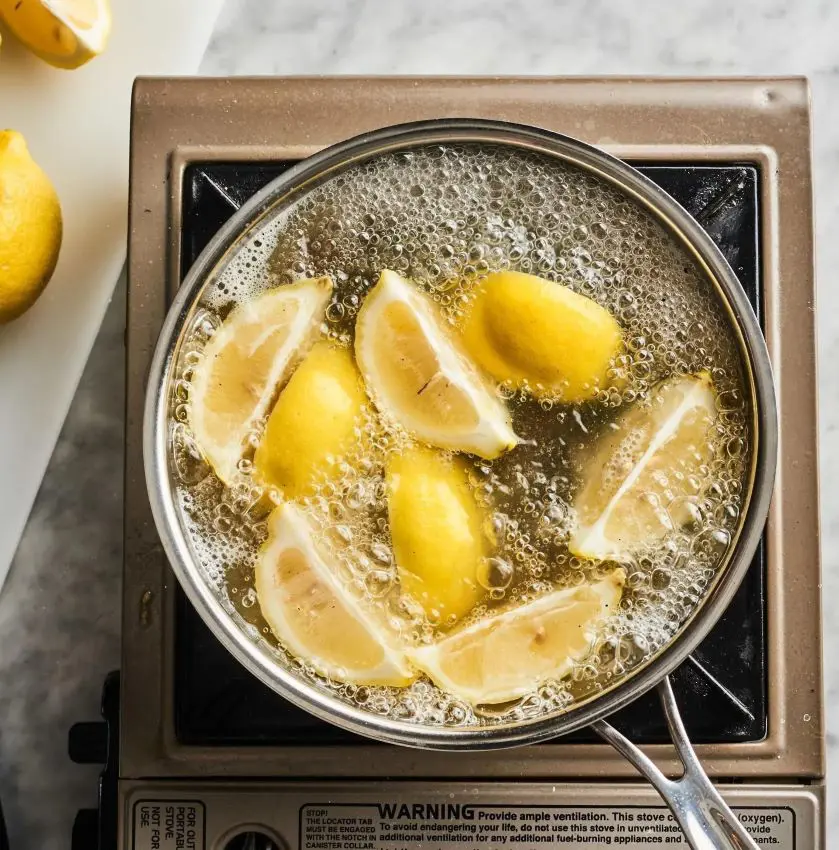
This method utilizes the acidity of lemons to help break down burnt food residues, making it easier to clean your cookware. Let's have a look for more:

Ingredients and Tools

  • 2-3 lemons
  • Water
  • Measuring cup
  • Stove
  • Scrubbing pad or brush
  • Wooden spoon or spatula
  • Dishcloth or paper towels

Instructions

  1. Slice 2-3 lemons into quarters or eighths. More exposed surfaces enhance the cleaning effect.
  2. Spread the lemon cuts evenly across the bottom of the burnt pan.
  3. Boil the mixture for 5-10 minutes on medium-high heat.
  4. Remove from heat and let cool slightly.
  5. Discard lemons and water carefully.
  6. Scrub the pan with a pad or brush to remove loosened residue.
  7. Clean thoroughly with warm water.
  8. Dry completely with a cloth or paper towels.
  9. Repeat if necessary for stubborn spots.

Source : thekitchn

Pros:

  • Natural and eco-friendly: Natural and non-toxic cleaning method
  • Pleasant aroma: Leaves a fresh, citrus scent
  • Deodorizing: Helps eliminate burnt food odors effectively
  • Antibacterial properties: Lemon's acidity can help sanitize the pan
  • Brightening effect: Can help restore shine to metal cookware

Cons:

  • Time-consuming: Requires boiling and cooling periods, taking 20-30 minutes
  • May require repeated applications: Stubborn stains might need multiple treatments
  • Limited effectiveness on severe burns: Extremely stubborn stains might resist this method

3. The Boiling Water Method

If your pan happens to be non-stick and burns fall within the range of a light to moderate amount, then boiling water would be a good and easy option for cleaning.

Ingredients and Tools

  • Water
  • Stove
  • Measuring cup
  • Wooden spoon or spatula
  • Non-abrasive scrubbing pad or sponge
  • Paper towels
  • Gloves (optional)
  • Dish soap (optional; for alternative approach)

Instructions

  1. Fill the burnt pan with water, covering the entire area of the pan where food has burnt onto the surface.
  2. Put the pan on medium heat, until it reaches a boil.
  3. Let boil for 5-10 minutes then remove from heat and let it chill completely.
  4. Rinse off the water and scrub the pan with a non-abrasive pad. Pay most attention to the burnt area.
  5. Rinse thoroughly with warm water and dry it off with a neat, dry cloth.

Alternate: Boiling Water and Dish Soap Method

  1. Fill pan with water, adding a few drops of dish soap.
  2. On stove, bring this soapy water to a boil.
  3. Allow it to simmer for 10-15 minutes.
  4. Allow to cool slightly. Scrape off slackened residue with the aid of a non-abrasive scrubber.
  5. Rinse with warm water.

Source : spoonuniversity

Pros:

  • Simplicity: You need nothing but water and heat, which anyone has at their disposal.
  • No harsh chemicals: It's ecologically safe because you won't introduce anything potentially hazardous into your kitchen.
  • Cost-effective: You are not spending any money on special cleaners.
  • Quick start: You can start with cleaning right away without buying and preparing special supplies.

Cons:

  • Not always effective: In the case of seriously burnt or stuck-on food, boiling water mightn't be enough.
  • Energy use: Boiling water takes some energy, which adds a little to your utility bills if constantly done.
  • Limited to heat-safe pans: The method is not suitable for pans that cannot support high temperatures.
  • Potential for steam burns: Steam from boiling water could give you burns if you are not careful.
  • May not disinfect: It does manage to loosen food particles, but boiling water alone may not kill all the bacteria that have formed, especially in badly soiled pans.

4. Dish Soap And Aluminum Foil

This method is simple, requires minimal ingredients, and can restore your pans to their original condition.

Ingredients and Tools

  • Dish soap
  • Water
  • Aluminum foil
  • Measuring cup
  • Stove
  • Sponge or scrubbing pad
  • Dishcloth and paper towel

Instructions

  1. Start by pouring 1-2 cups of water into your burnt pan. Add a few drops of dish soap and gently mix to create a soapy solution.
  2. Place the pan on your stove and turn the heat to medium. Watch as the soapy water comes to a gentle simmer, helping to loosen those stubborn burnt food particles.
  3. Let the mixture work its magic for about 5-10 minutes.
  4. Take the pan off the heat. Now, grab a piece of aluminum foil and crumple it into a tight ball that fits comfortably in your hand.
  5. Time to scrub! Use your aluminum foil ball to gently scrub the burnt areas. This
  6. Rinse the pan under warm water
  7. Got some stubborn spots left? No worries! Use a sponge or scrubbing pad with a bit more dish soap to tackle those tricky areas.
  8. Finally, grab a dishcloth or paper towel and dry your pan thoroughly.

Source : thekitchn

Pros:

  • Effective scrubbing: Aluminum foil creates an aggressive yet gentle scrubber that works well for tough burnt-on food.
  • Gentle on non-stick surfaces: Less likely than steel wool to scratch non-stick coatings.
  • Cost-effective: Reuses aluminum foil, giving it a second life before recycling.
  • Adaptable: Works with various types of cookware-from stainless steel through enamel.

Cons:

  • Time-consuming: It takes more time than a quick clean because it entails first heating the soapy water and afterward cleaning.
  • Potential for burns: Working with hot water and a recently heated pan could pose contact burn risks.
  • May not work for all types of burnt residue: Extremely carbonized or sugar-based burns may resist this method.
  • Creates additional waste: While aluminum foil is recyclable, this does tend to use up foil that may not be necessary otherwise.
  • Requires physical effort: The actual action of scrubbing, while effective, does require a bit of elbow grease on your part.

Some Other Alternative Ways

Let's see some creative ideas to defeat those stubborn burnt pans! Here come three other ways that might join your favorite cleaning tricks:

1. Salt and Lemon Scrub:

Time for a citrus-fresh cleaning! Take some coarse salt and a lemon, and let's get working:

  • Sprinkle liberal amounts of coarse salt over the burnt spots of your pan.
  • Cut a lemon in half and use it as your scrubber. The acidity in the lemon marries with the grit of salt to magically whisk away burnt food.
  • Then, rinse your pan with warm water and dry it well.

2. Baking Soda Paste Power:

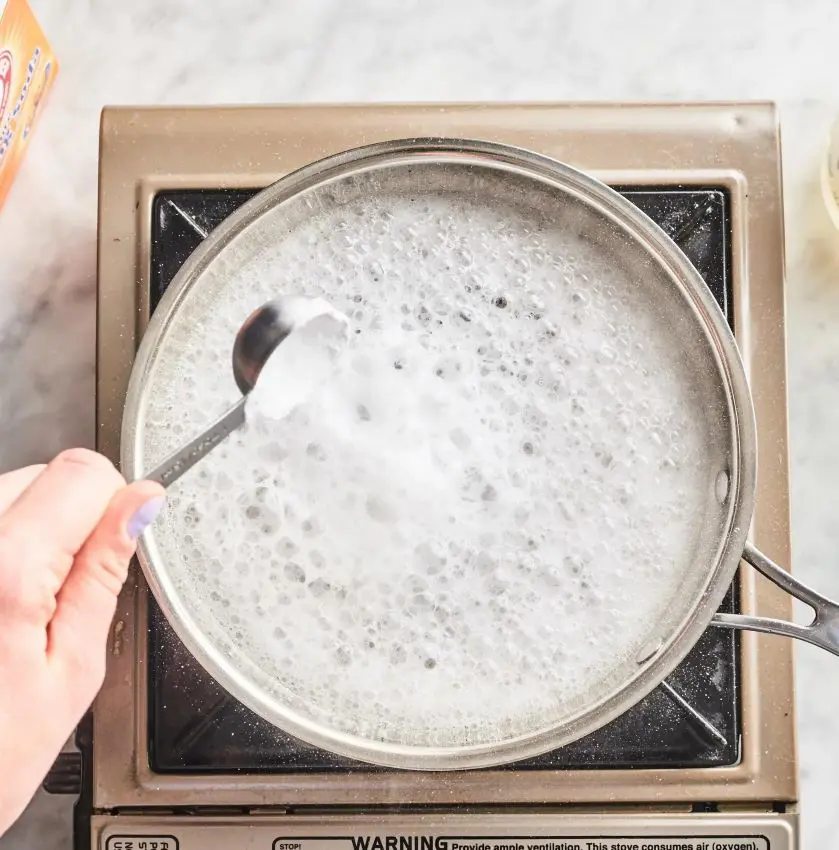
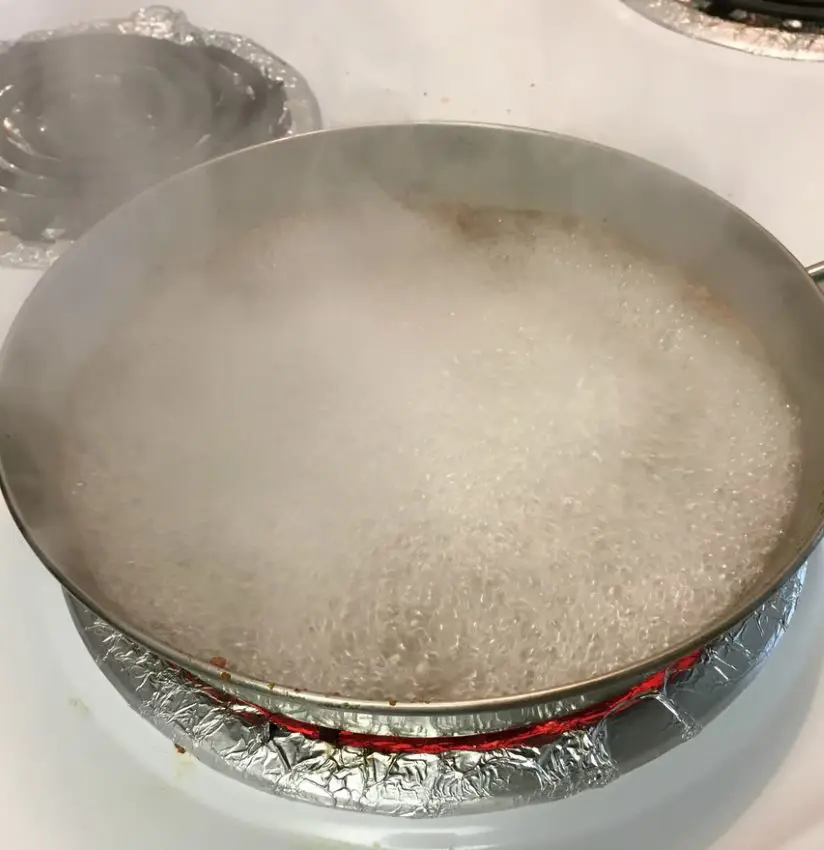
Here is another power-blast method that wields a mighty cleaning wallop:

  • Mix three parts baking soda with one part water to make a thick, spreadable paste.
  • Slather this paste over the burnt areas and let it sit. For lighter stains, 30 minutes will do. For the tough ones, let it overnight.
  • Take a non-abrasive scrubber and work that paste into the residue of your burn.
  • Rinse your pan with warm water thoroughly and admire the miracle!

3. Cream of Tartar Solution:

Here is one less known but really working method of cleaning:

  • In the burned pan, mix a tablespoon of cream of tartar in a cup of water.
  • Bring this mixture to a boil right in the pan. Allow it to cool down, then use a non-abrasive scrubber to work the solution into the burned areas.
  • Give your pan a good rinse with warm water.

Why Clean Burnt Pans

Source : reddit

1. Restore and Extend:

Cleaning burnt pans is not just housekeeping; it's giving new life to your cookware. You are maintaining your pans in good condition for the many meals that you will make with them.

2. Cook Like a Pro:

A clean pan is your secret to better cooking. No more sticking and the pan heating up unevenly. Dishes will soar with this pristine cooking surface. Who knows-you may just amaze yourself in the kitchen!

3. Keep It Healthy:

Nobody wants yesterday's burnt bits in today's meal. Scrub that residue away, and you kick out the unwanted bacteria in that way, preventing unsavory cross-contamination that will make your food taste better and be safe.

4. Save Your Cash:

Think of cleaning as an investment. A well-cared-for pan gets years of service without needing to constantly shell out money for new cookware. Your wallet thanks you!

5. Kitchen Glam:

Let's face it-shiny, clean pans just look better. They can make your kitchen go from drab to fab in a heartbeat, making it a far more inviting place to cook in.

6. Build Better Habits:

Getting into the rhythm of cleaning pans can be a great trigger of good habits in the kitchen. Next thing you know, you will be a whiz at maintaining your whole cooking space spick and span.

7. Go Green and Save Green:

Most methods of cleaning pans use common things available in every household. Not only is this easy on your wallet, but it's also kind to the environment. It's a win-win!

How Often To Clean Burnt Pan

Keep your pans in good condition! Here is a simple guide to show you how often you should attack those burnt pans:

Clean After Every Use:

You must clean your pan after every use. Food residues will not gather up and get stubborn for you to clean later. A quick wash right after you cook with warm soapy water will save you from a lot of elbow grease later on.

Address Burns Immediately:

Scorch marks in your pan? Do not wait! Try cleaning the pan the moment it cools enough to touch. The longer burnt residue is allowed to sit, the more difficult it becomes to get off.

Deep Clean As Needed:

For the heavily used pans or those with resolute burnt-on food, try doing a deep clean of it every couple of weeks. This could be where you might want to use one of those specialized cleaning methods we talked about earlier, such as the baking soda paste or aluminum foil trick.

Check Before Each Use:

Give your pan a skim before you start cooking. If there is a little lingering residue or discoloration, take a minute to clean it before you begin your meal preparation.

Seasonal Deep Clean:

Yes, you can clean your pans often, but sometimes taking the time to really deep clean all your pans a couple of times a year isn't a bad idea. It's a spa day for your pans!

Listen to Your Pans:

Pay attention to how your pans are performing. If your food is starting to stick more than usual or you notice uneven heating, then it might be time for a good cleaning session.